Here is the best, cheapest and easiest way to record a podcast in Mac OS X.
This will be using GarageBand, LineIn, Skype and Soundflower – all free software! The only thing you’ll need to purchase is a quality microphone. This post is about how to set up your Mac in order to record remotely over Skype. That is, this is about recording a podcast with a remote caller via Skype and getting the audio from both sides of the conversation – something that has a history of being fairly tricky.
It’s really not that hard though, there are just a bunch of different moving parts. This post aims to make it as simple as possible! Here we go…
Get Your Software Downloaded
- Make sure you have GarageBand. GarageBand comes free with any Mac and has been installed by default on new Macs for a long, long time now. If for some reason you don’t have GarageBand (or maybe deleted it), you can download it here.
- Download LineIn. It’s a simple yet powerful app. (And trust us, this is all legit software!) It lets you change your audio input devices (more on that later).
- Download Soundflower. Another simple app that lets you route audio to different places.
(*NOTE – when installing Soundflower you might get an error that “Soundflower.pkg can’t be opened because it is from an unidentified developer”. Just right-click on the app and select open to bypass this. Click here for more info on how to get around this error.) - Download Skype for Mac. However, you’ll need an older version of Skype to get audio from it. Go here to oldapps.com and download “Skype 2.8.0.866”.
(*Yes this version of Skype is an older app, but it works – even in OS X 10.9. The reason you need the older version is that Microsoft bought Skype and stripped out some functionality, so you can’t hijack the audio from it into GarageBand. There might be a workaround in the future but for now this is what we have to do.)
App Setup
Here’s how we setup each of the apps you just downloaded. This is the meat of this podcasting how-to. It’s not very difficult, you just have to take care to do each step just right, otherwise it’s a lot of head scratching to figure out where you went wrong! :p
Soundflower Setup
Soundflower is a simple app that runs in the background, so you’ll only see it in your menubar, like this:
![]()
Typically the default settings should work for you. But to double-check and make sure here are the settings you need. Make sure that both Soundflower (2ch) and Soundflower (64ch) are both set to NONE (OFF).
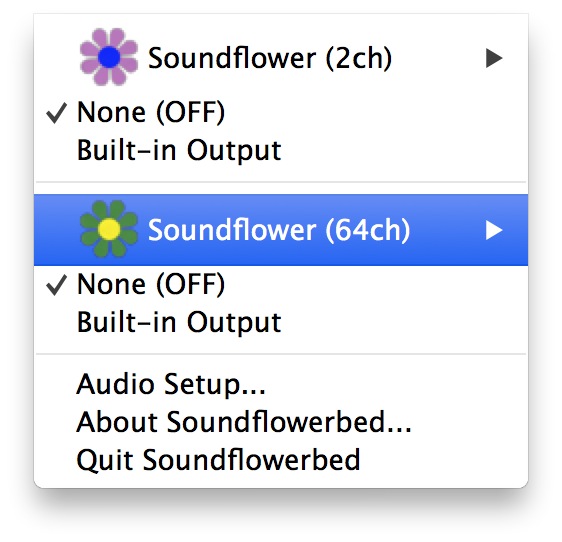
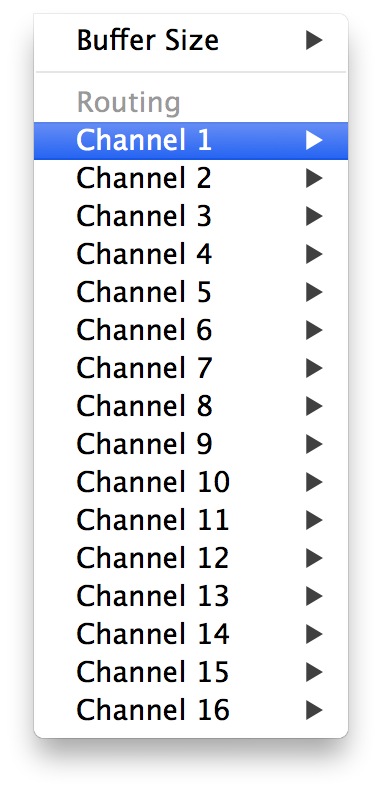
Then under Soundflower (64ch), make sure that Channel 1, Channel 2 and Channel 3 are set to NONE.
That’s all you need to do for Soundflower.
LineIn Setup
LineIn is also a very simple app with just a few settings.
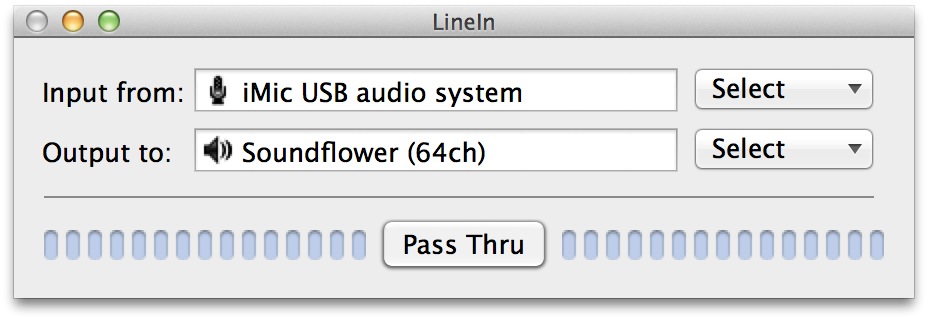
“Input from:” should be set to the input device you’re recording from, typically a Microphone. You can use your Macs built-in microphone (select “Built-in Microphone: Internal microphone” from the drop down menu) although we suggest a better mic than that if you want your podcast to sound good.
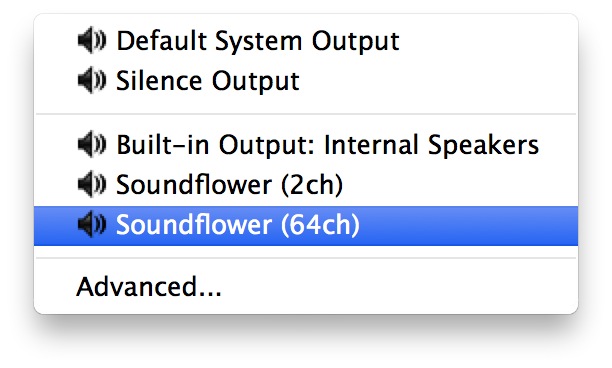
For “Output to” select Soundflower (64ch).
In the select dropdown on the right go to “Advanced…” and use these settings:
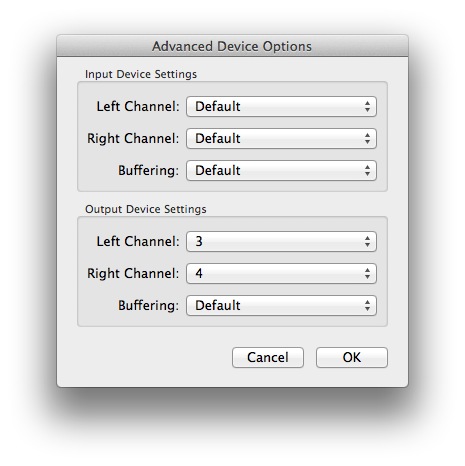
For Input Device settings for Left Channel, Right Channel and Buffering, leave at Default.
For Output Device settings, set Left Channel to 3 and Right Channel to 4. Leave Buffering at Default.
(You *could* use other channels. As you probably guessed, Soundflower gives us 64 channels. We’ll just use 3 and 4 for our remote Skype audio.)
(Note that it doesn’t make any difference if you go to Select -> Advanced from the “Input from” or “Output to”, they are the same settings. i.e. there is only one Advanced Device Options config panel)
Then hit ok to go back to the main LineIn window and click the “Pass Thru” button.
Clicking Pass Thru allows audio to literally pass through LineIn using the settings you just modified. You should see active audio “lighting up” blue around the pass thru button if you talk into your mic.
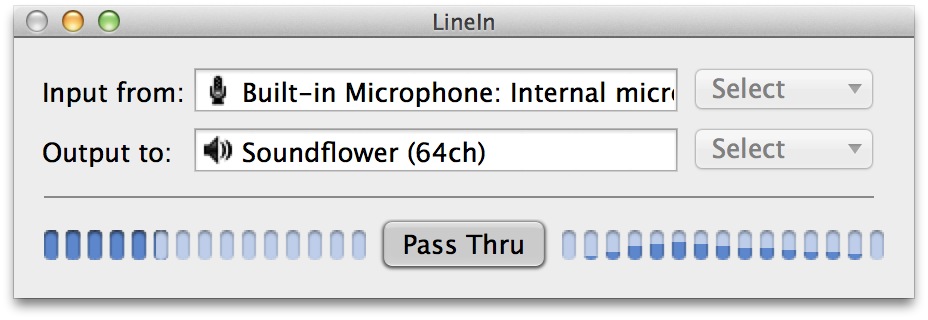
Basically what we’re telling LineIn to do is direct audio from your Microphone to Soundflower.
Skype Setup
The Skype settings are also very basic. As noted before, at time of writing you need a version of Skype that lets you change both the audio input and audio output. This means Skype 2.8 or below. (More recent versions don’t have this unfortunately – holler at Microsoft for that.)
- In Skype, go to the Skype menu -> Preferences.
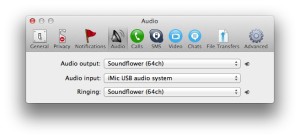
- For audio output select Soundflower (64ch).
- For Audio input select your mic (in my case, iMic USB audio system).
- Ringing can also be Soundflower (64ch) although you might want to change this to Built-in output so as not to be recorded.
That’s all you need to do for Skype.
GarageBand Setup
We’re not going to get in-depth about how to record a podcast in GarageBand. This is moreso about how to set up GarageBand to have the proper audio.
In GarageBand, go to the GarageBand menu -> Preferences. Click on the Audio/MIDI tab.
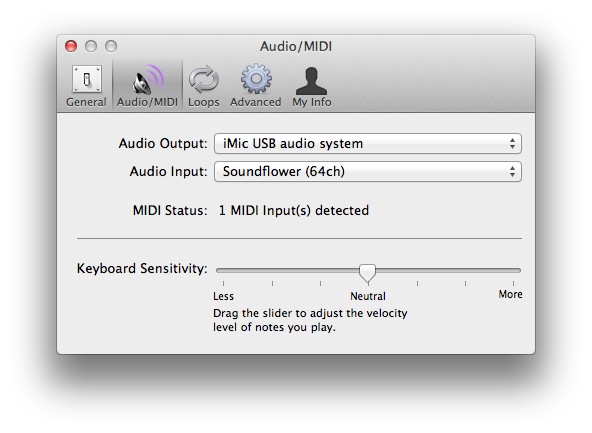
For Audio Output, select your mic.
For Audio Input, select Soundflower (64ch)
That’s all you need to do in the GarageBand preferences so close that window.
You should be working with a Podcast GarageBand project. (If you’re not in one, go to File -> New, Click New Project, select Podcast and click Choose.)
You need to have 2 tracks to record on – one will be your local Skype audio (yourself talking) and the other will be the remote Skype connection (audio of one or more callers).
To make a 2nd track go to Track -> New Track, select Real Instrument and click Create.
You also need to enable multitrack recording, otherwise GarageBand will just get audio from one track. Go to Track -> Enable Multitrack Recording.
You need to make sure that both of your audio tracks will be recording. This is the little dot as shown below – make sure that it’s red otherwise that track won’t be recorded.
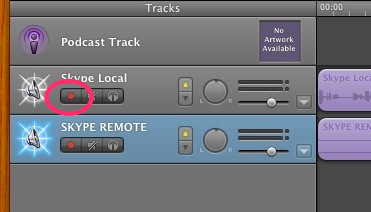
The red dot that needs to be on.
Double-click on your first audio track. This should bring up the Instruments panel on the right. You could also hit command-I or go to Track -> Show Track Info.
Select an effect: go to Vocals and choose either No Effects, Male Basic or Female Basic. (Of course these are just suggestions! If you want to get wacky, you could pick other effects but that could complicate things, or make your podcast sound weird.)
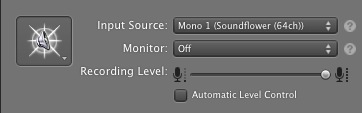
Down in the bottom right (as pictured above), for Input Source select Mono 1 (Soundflower (64ch)).
Leave Monitor on Off.
I like to put recording level at 100% and adjust elsewhere if that’s a problem.
Click Save Instrument and give it a name like SKYPE LOCAL, that way you know what track it is.
Now click on your 2nd audio track.
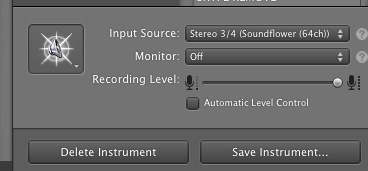
In the bottom right this time for Input Source select Stereo 3/4 (Soundflower (64ch)).
Leave Monitor on Off and put recording level at 100%.
Click Save Instrument and give it a name like SKYPE REMOTE.
You’re done with GarageBand!
Test Your Setup
Now we’re ready to test and make sure that audio is flowing properly and everything is configured properly.
Thankfully, Skype has a nice way to do this. There is a “Skype Test Call” in your Skype contacts by default. You can use this to have a fake test call come through. (If you don’t have it, you can search for a user with the name of “echo123” or the name “Skype Test Call“.)
Hit record in Garageband (or command-R) and then go to Skype and start a test call. You’ll hear a nice British female voice. It’ll even record what you say and play it back to you to make sure everything on Skype is working.
Once you and the fake British lass have both said something, hit command-R or otherwise stop recording (space bar will also work or clicking the record icon). You can usually see wavelengths now in the track listings, but play it back to make sure. You should (fingers crossed) be able to hear audio from both you and the British Skype lass.=
Did it work?
Hell yeah, congratulations! Hopefully it didn’t take you the eons it took us to get it working.
Didn’t work? Here are some troubleshooting tips…
- First, simmer down and go back through your settings slowly. There are so many moving parts that maybe something wasn’t set right. Patience, grasshopper. No “HULK SMASH” allowed. It’s probably one little setting somewhere.
- Next, you could also check your sound preferences. Go to System Preferences and then Sound. Make sure output is on Internal Speakers (or however else you want to listen to the podcast as it’s being recorded) and that input is set to your microphone.
- Make sure that LineIn is set to Pass Thru and that you see audio when you talk into your mic.
- Check out the Audio MIDI Setup app. There’s a little-known utility in Applications -> Utilities. (Or you could use the command-U shortcut to get to Utilities.) The Audio MIDI Setup app has more settings than the standard sound settings in the System Preferences. This shouldn’t be a problem, but if the defaults ever changed, it could be the culrpit. (Also you can set volume levels here.)
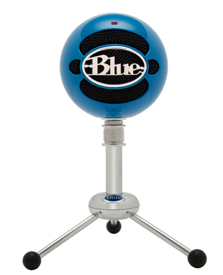
Need a Microphone?
We recommend the Snowball mic from Blue. They come in a bunch of different cool colors, including blue. (You can also have a white mic that says Blue on it to blow people’s minds…)
The Blue mic is $69, sounds great and is easy to use. It’s one of the best and cheapest podcasting mics out there, plus it wins some style points for all the cool colors it comes in.
Sources
We cribbed from several sources but these ultimately didn’t work for us separately. However if you need further help or are on an older Mac, maybe these will do the trick for you:
http://www.donaldsinatra.com/2011/03/recording-a-podcast-with-skype-and-garageband-for-free/
http://www.wikihow.com/Record-Skype-Into-Garageband-With-SoundFlower-and-LineIn
http://ianolsonsbb.wordpress.com/2012/10/28/podcast-tutorial-using-skype-and-garageband
That’s All Folks!
If you have questions or comments or other possible fixes, please address those in the comments below.
We hope this will help someone in a time of podcasting need. 🙂